Multi-selection and Multi-editing
Multi-selection (i.e., selecting multiple items at once) is pretty routine in any modern operating systems. But you might not realize some of the incredibly useful things you can do with multi-selection in OpenRocket, starting with version 22.02. This tutorial will show what’s possible.
Contents of this tutorial:
Notes
I’ll be focusing on operating on the Component Tree, i.e.:
You can also do some multi-selection in the rocket figure display, although the mouse conventions are slightly different.
Basics
In a nutshell, multi-selection is the ability to select multiple components simultaneously. Most computer users are already familiar with this… you can use multi-selection when dealing with almost any list of things, like emails, or files, or whatever.
Generally, control-clicking the mouse will let you toggle the selection of individual items. In a few seconds I can do this:
Shift-clicking, on the other hand, will select the item you’re clicking and all items between it and the most recent selected item, and unselect others. So, let’s say I first select Body tube and then control-click on Wadding. I get this:
Now I shift-click on Inner Tube, and I end up with this:
I’ve now select a contiguous block from Wadding (most recently selected item) through Inner Tube. Meanwhile, Body Tube became unselected.
Using shift-click and control-click, you can pretty quickly and easily select whatever collection of components you want.
Simple Operations
The first things we can do with multi-selection are the obvious editing functions. Most of what’s described here can be accessed in 4 ways:
-
The big ol’ edit buttons next to the component tree:
-
The Edit menu:
-
The keyboard shortcuts as shown in the Edit menu (
Ctrl+E,Ctrl+X, etc.). -
The contextual menu (
right-clickon one of the selected items):
So, by whatever is your preferred method, you can delete, duplicate, copy, paste, or reposition the selected items in the list. To reposition items, there’s a fifth method: simply drag the selected item(s) up and down within the list.
So far this is all pretty routine. Things get more interesting from here.
Multi-Editing
The first really cool thing you can do is multi-editing components. How does that work? Well, for any selected set of components, the config dialog will only show parameters that are shared among all the selected components. Changing any of those parameters will then affect all of them.
Start multi-editing the same way you would edit a single component: select the components to be edited, then click the Edit button or any other of the methods described above.
Here are some examples.
Homogeneous Editing
Let’s try editing two centering rings. Because the two component types are identical, all the parameters are in common between them, and therefore you can edit anything. Want to change these to 1/8” plywood rings? Just change Thickness and Material and they’ll all be updated. Just don’t touch the things you don’t want changed. At present, the dialog does not show you which parameters are changed and which are not, so you’ll need to keep track. If you mess up, you can always undo.
Note that the config editor reminds you that you’re editing multiple components in 2 places: the title bar and in the lower left corner.
Heterogeneous Editing
What if we try to edit a nose cone and body tube together?
The only common parameters are Overrides, Appearance, and Comments. This is a pretty typical result of multi-editing different components. Even though both Nose Cone and Body Tube have some parameters that seem the same (e.g., outer diameter), at the moment they are considered different and cannot be multi-edited.
Multi-editing appearance is incredibly useful, when you’re experimenting with the appearance of the rocket. Want to change the color of the whole rocket in one shot? Just select everything and change it all at once.
The Effect of Assembly Components
Unlike every other component type, assembly components (Stage, Boosters, and Pods) do not have appearance associated with them. Therefore, if you have included any of them in your selection, you will not be able to edit appearance anymore (since it is not common to all selected components). E.g.:
Therefore, if it is your goal to edit the entire rocket appearance and you start by multi-selecting everything, you’ll need to then go back and manually unselect (via control-click) the assembly components. In this case, once I unselect Sustainer it goes back to looking like I want:
Freeform Fins
A fun thing you can do is multi-edit Freeform fin shape. Here the trapezoidal fins have been converted to freeform, and then another freeform set was added. When the Shape editor is opened, we see the shape of the first selected fin (the trapezoidals):
Now, what happens if I move the top left vertex?
As you can see in the rocket figure, both fin sets have been reshaped. This is a bit weird, but can be useful in some circumstances.
Select Components of Same Color
Those who like to use OpenRocket to play around with paint schemes will appreciate this feature, which is new to version 23.09. Here’s an OR model of the Odd’l Break-Away:
That mono paint scheme looks great, but maybe we want to try some color instead of the gray. What we can do now is:
-
Select one gray component
-
In the
Edit menuor theContext menu, chooseSelect -> Components of same color: -
And voila.
-
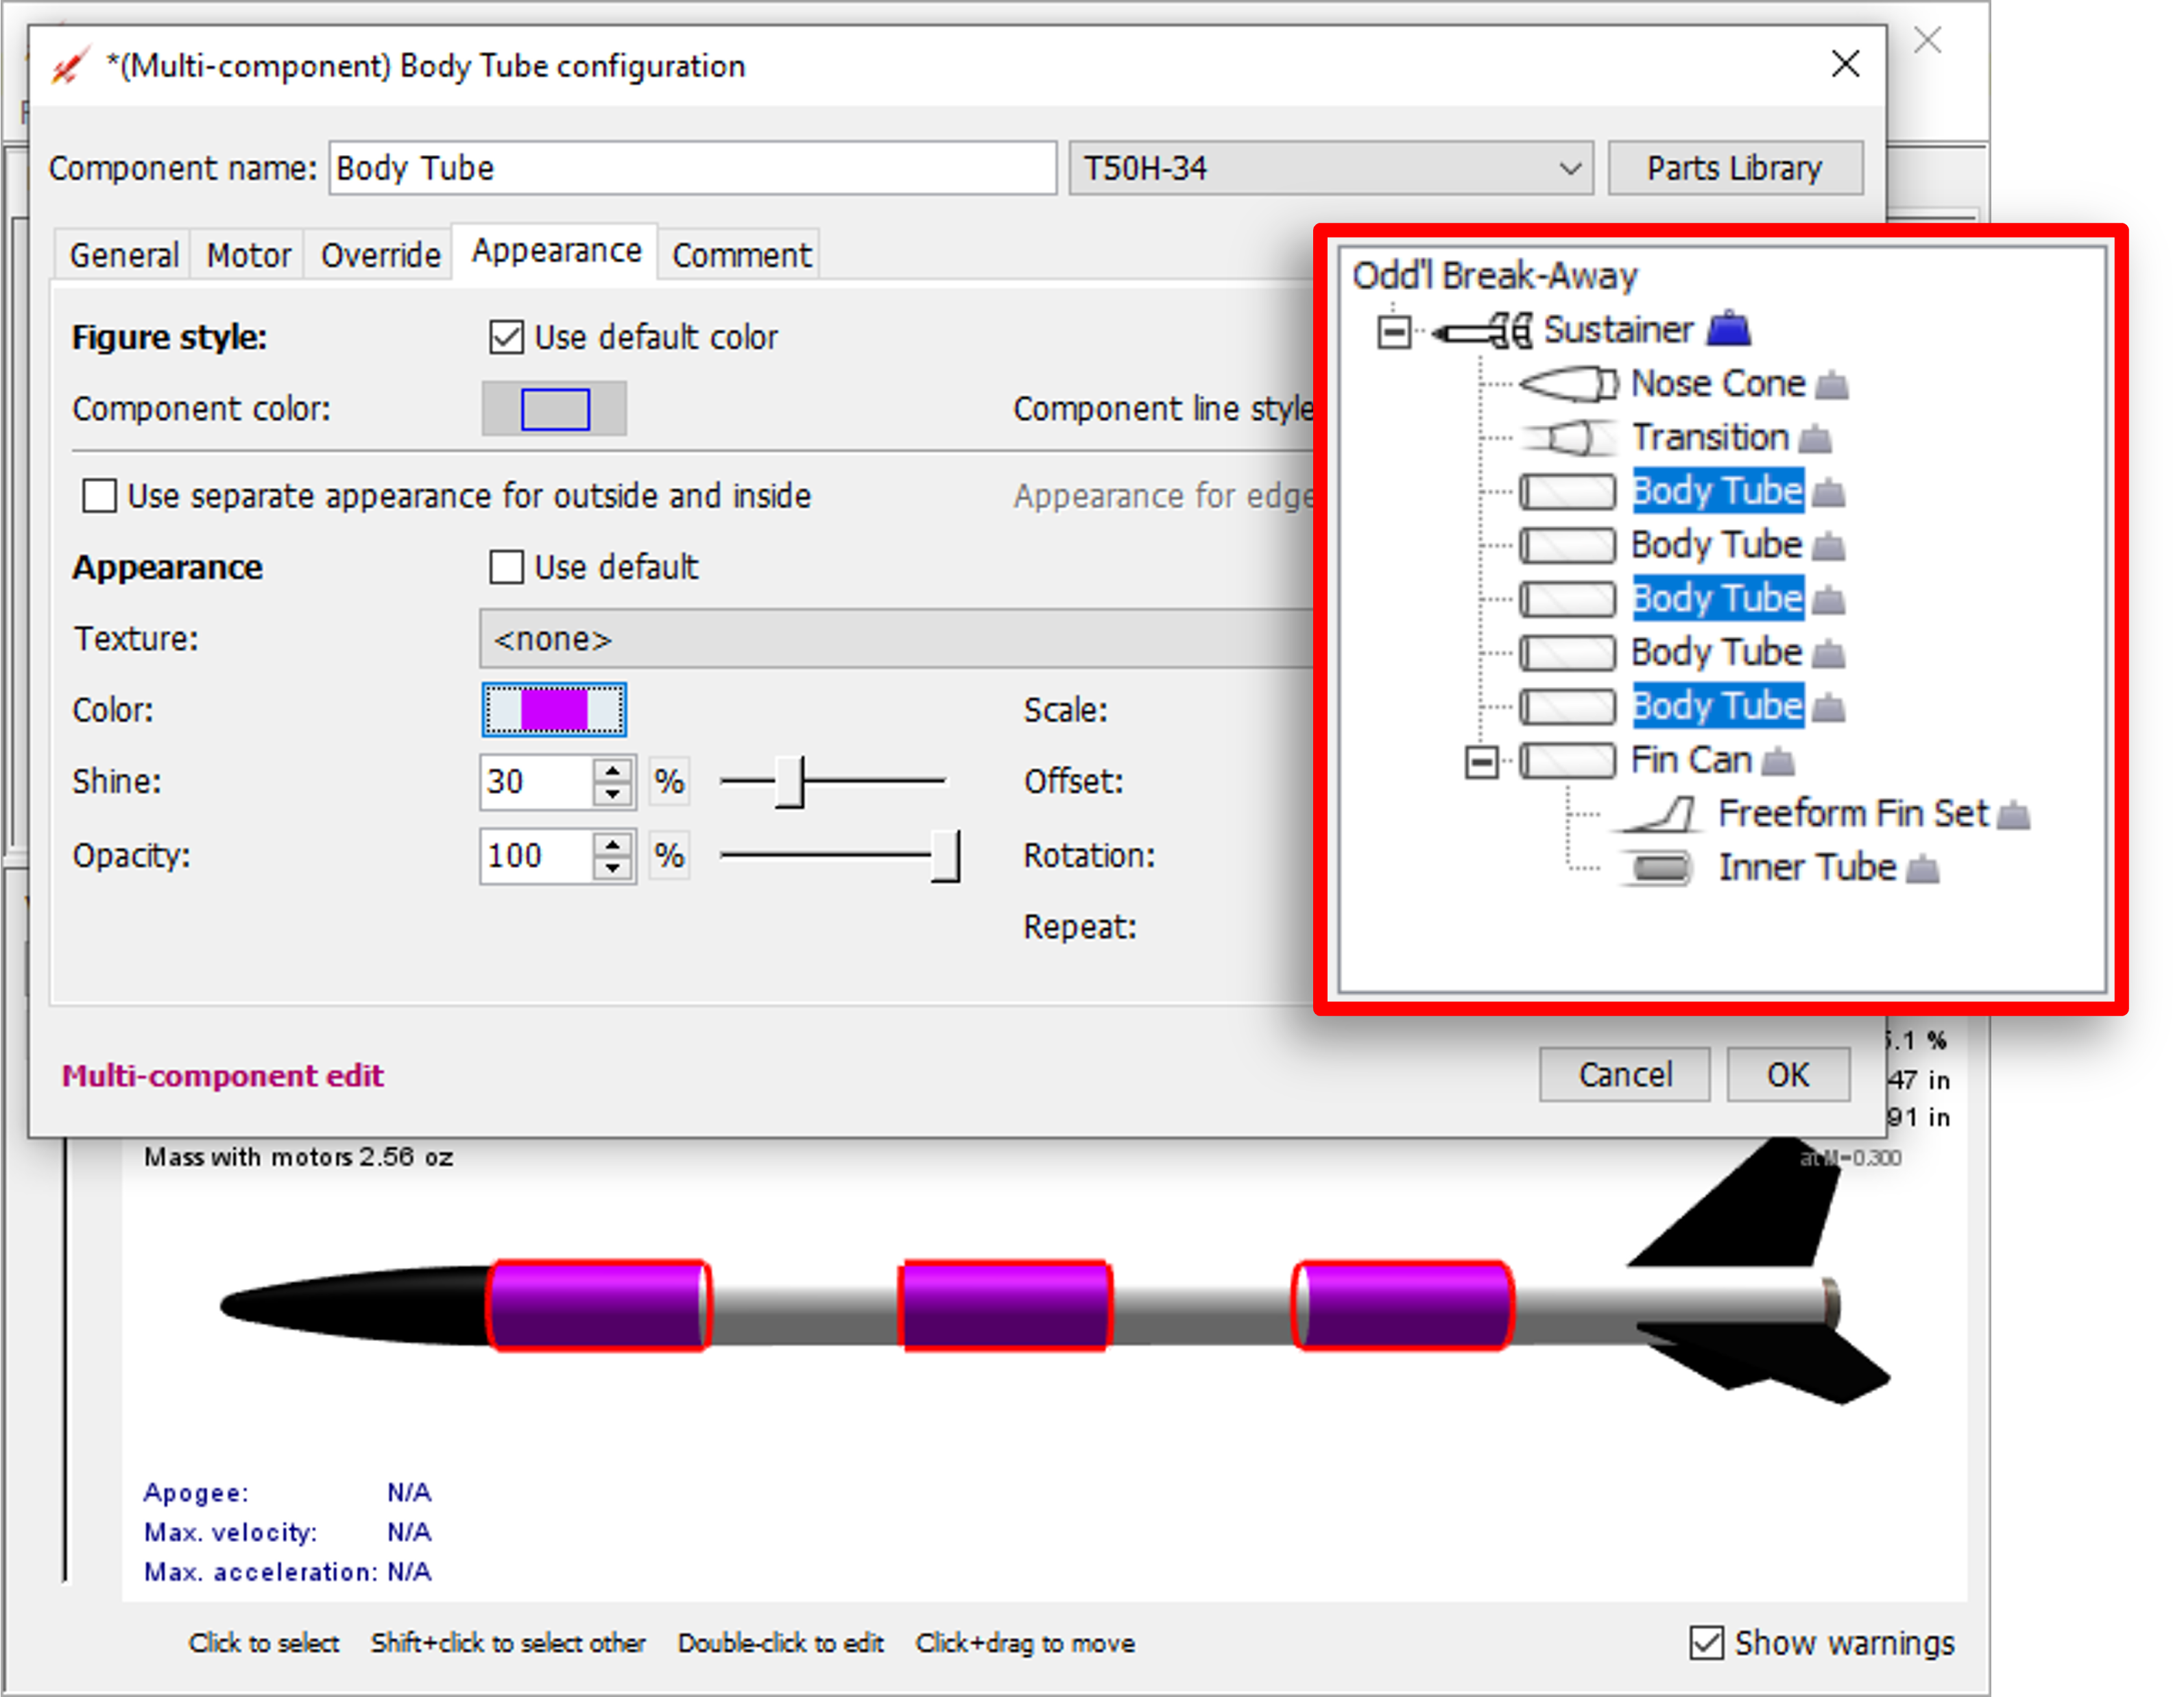
Now I can easily edit and change the colors of all of them at once, e.g.:
Additional notes on appearance editing
-
When you edit a multi-selection, the displayed parameters are the ones from the first component that was selected. This knowledge will come in handy with item #2.
-
Let’s say I have a component that is the perfect of turquoise, and now I want to set another component to the same color. For instance, I think this would look better if the nose cone matched the fins:
Start by multi-selecting the fins and the nose (select the fins first) and edit:
As described above, the parameters you see are from the first component selected, which is the fin set, and there’s that lovely turquoise. So how do I set the nose to the same color?
The editor will only apply changes to the selection. So in this case, click on the color swatch, which opens up the color selector, and then simply say OK. This doesn’t actually change to a different color, but it registers as a change anyway. Click OK and now you have the beautiful result:
OK, maybe that wasn’t the perfect shade of turquoise.
For numeric parameters, the best way to register a change is usually just to click the up/down buttons up and then down, returning it to the original value but registering it as a change.
Sims and Motor Configurations
It’s not just components that can be multi-edited. You can also use it for sims and motor configurations.
First let’s talk about sims, because this is genuinely useful. Recall that if you edit the simulation preferences…
…that nice bold red text reminds you that the changes will only apply to newly created sims. If you want to change the conditions of existing sims, you can multi-select sims in the table and then edit them all at once. So let’s say you mistakenly set the launch rod too short, or some other obvious mistake that you want to correct on all the sims… just select them and edit, and the changes will apply to all the selected items.
OR can also export the sim results table to a CSV file. If you multi-select a group of sims, then you can export just those. This screenshot shows it being done with the contextual menu, but you can also do it via the same option in the File menu.
There are probably fewer occasions where multi-editing motor configurations would be useful, but it’s possible. You can select some set of motors in the table…
…then click Select motor and the resulting selection will be applied to all the selected configurations.
And finally: you can multi-edit the Recovery and Stages sub-tabs in Motors and configurations, e.g.:
Noticed a mistake? Please notify us at openrocket-website@lists.sourceforge.net.