Export design to OBJ file for 3D printing
3D printing (parts of) your design is now possible, thanks to the OBJ export feature introduced in OpenRocket 23.09. This tutorial will show you how to export your design to OBJ, and how to prepare it for 3D printing.
Contents of this tutorial:
Preparing your design
Since you’re now moving from the digital, simulation world to the physical, 3D printing world, you’ll have to take into account some things that you didn’t have to worry about before. You’ll have to make sure that your design is printable. Ensure that there are no components with a width of zero in your design, that the walls are thick enough, and that the parts fit together well. For example, if you have a nose cone that fits into a tube, make sure that the nose cone shoulder is slightly smaller than the inner width of the tube, so that after printing the parts fit well together.
We recommend you take a look at our 3D Printable Nose Cone and Fins example file, which you can access by going to File > Open example > 3D Printable Nose Cone and Fins. This file contains a design that is ready to be exported to OBJ and 3D printed.
Exporting to OBJ
-
The first step is to select the objects you want to export. You can select single components, or multiple objects by holding down the
Ctrl/Cmdkey while clicking on the components. If the selected component contains children, you can also choose to export the children components as well. If you want to export all objects, you can select the rocket component. -
Once you’ve selected the objects you want to export, go to
File > Export as > Wavefront OBJ (.obj). This will open the OBJ export dialog. Alternatively, you can right-click on the selected components in the component tree and chooseExport as OBJ (.obj). -
You will then be greeted by the OBJ export dialog. Here, you can choose your export location and filename, and set the export parameters. The export location is the folder where the OBJ file will be saved. The export parameters are explained in the next section. You can verify which components will be exported by hovering over the text in the
Componentfield.When you’re done, click
Save. - If there are any warnings during the export process, you will be notified by a dialog. For instance, if you have a zero-width body tube, you will get the following warning:
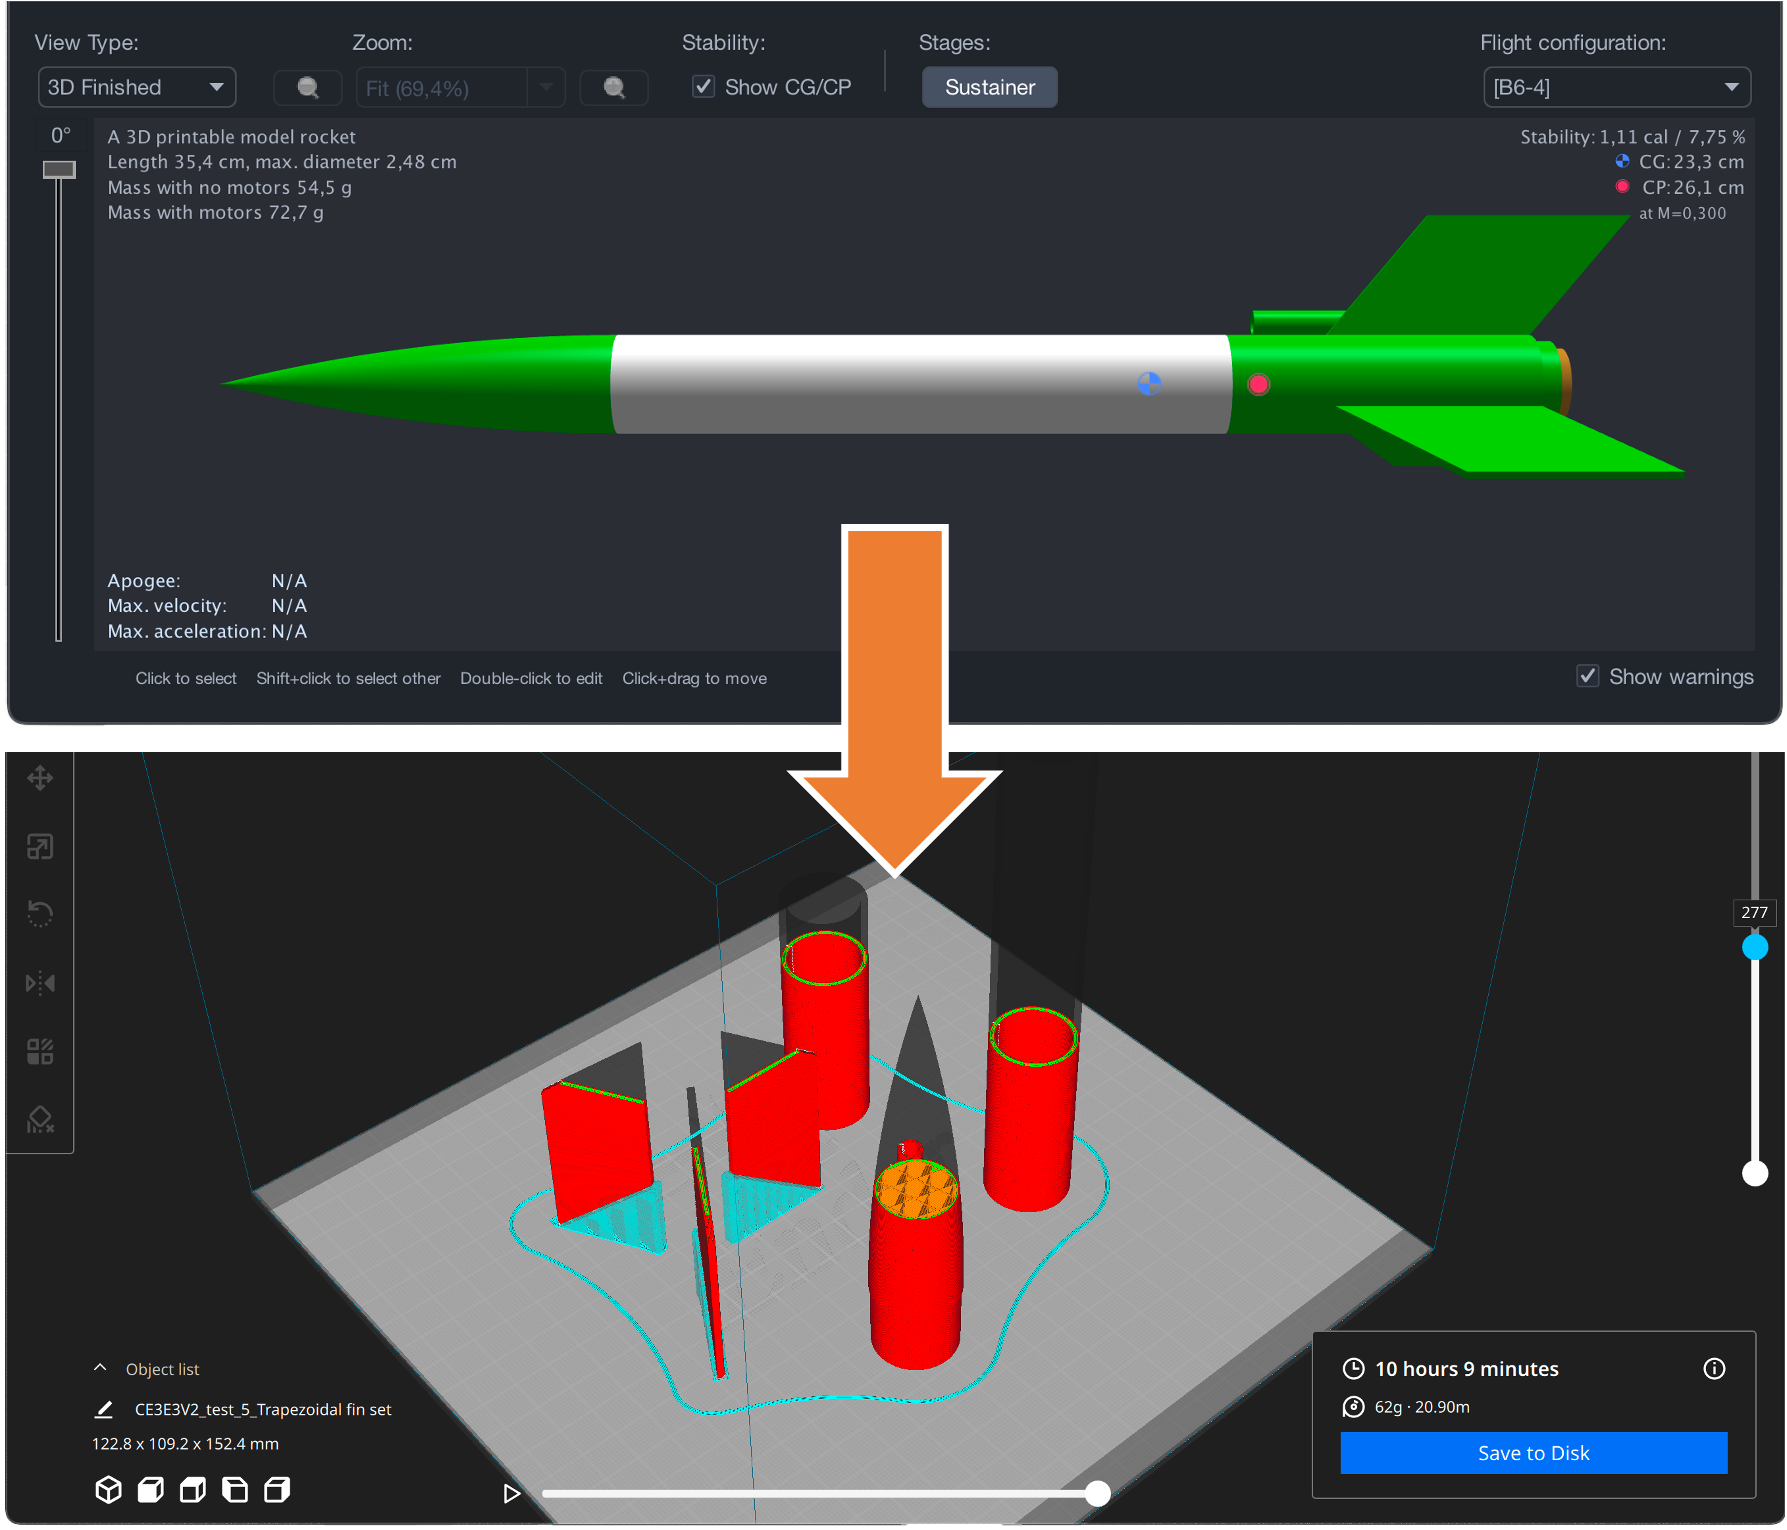
- Now you can open the OBJ in your slicer software and prepare it for 3D printing. In the given example, we've used UltiMaker Cura.
-
By now, some 3D printing enthusiasts may have noticed that the orientation of the fins is inefficient. You’re right, it should be oriented flat on the print bed to avoid the need for supports. To achieve this, we have to revisit the OpenRocket design.
Instead of exporting all the fin instances (an instance is one fin, there are three fin instances for the trapezoidal fin set in the given example), we need to export just one. This can be done by setting the fin count to 1, or by splitting the fin set into three separate fin sets, and then exporting each fin set separately. Since splitting the fin set will not alter the design, we will show you how to do that.
Edit the fin set, and activate the
Split finsoption on the bottom of the dialog. This will split each fin instance to a separate component. Now, all you have to do is export each separate fin instance as an OBJ file and bring that into your slicer. -
Now, you can export one of the fin instances and duplicate it 3 times in your slicer.
Export parameters
The export dialog has a few parameters that you can set to customize your export. Here’s a quick overview of what each parameter does:
By clicking on the Show Advanced options button, you can get more detailed settings, which are usually recommended for advanced users.
Component
This denotes the components you’ve chosen to export. In the given example, multiple components are selected for export. Hovering over the text will show you which components will be exported.
Optimize for
There are two options for optimization:
3D Printing: This setting optimizes the exported OBJ file for 3D printing purposes. It ensures the model is triangulated, appearance exporting is disabled, scaling is set to millimeters, and the level of detail is set to high.Rendering: If you’re planning to render the model in a 3D software, this setting ensures the model looks its best by optimizing for visual fidelity.
If your export parameters match either one of these settings, the corresponding button will be highlighted. In the given example, the export parameters match the 3D Printing setting.
Basic Options
Export children: If enabled, exports children of the selected components. Note: Component assemblies always export their children. If the selected components don’t have children, this option is irrelevant.Export motors: If enabled, this exports the motors of the rocket.Remove origin offset: If enabled, it removes the offset of the component from the origin. Otherwise, the component is exported at its original location in the rocket.Export appearance: If enabled, exports the component appearances to an MTL file. Note: The appearance cannot be exported with the triangulate feature enabled.Export as separate files: If enabled, exports each component as a separate OBJ file.
Advanced Options
Triangulate mesh: If enabled, triangulates the mesh before exporting, converting all quads or higher-order polygons to triangles.Export colors in sRGB: If enabled, exports colors in sRGB instead of a linear color scheme. This can be useful, for example, when exporting for use in Blender.Scaling: Allows you to scale the exported geometry by the specified factor. The default dimensions are in SI units (meters), but some software, like 3D printing slicers, often uses millimeters. In such cases, you can set the scale to ‘1000’.Level of detail: Lets you select the desired level of detail for the geometry export.
Noticed a mistake? Please notify us at openrocket-website@lists.sourceforge.net.